Introduction
Widgets have become an integral part of the iOS experience, offering users a quick way to access essential information right from their home screen. In this blog, we’ll explore how to create a widget in iOS using an extension, from setting up your project to customizing the widget’s interface and functionality.
Here’s an overview of how iOS widgets work:
- WidgetKit Framework:
Widgets in iOS are built using the WidgetKit framework. This framework provides the necessary tools to create, configure, and manage widgets. Widgets are written in Swift and built using SwiftUI, a declarative UI framework that allows developers to create the widget’s user interface.import WidgetKit
import SwiftU - Widget Architecture:
Widgets are different from apps in that they don’t have a full-fledged UI or navigation. They are instead designed to display a small amount of content or allow for specific interactions. A widget consists of three main parts:- View: Defines the widget’s user interface using SwiftUI.
- Timeline Provider: Specifies when the widget’s content should be updated. Widgets can be static (rarely changing) or dynamic (regularly updated based on time or events).
- Entry: Represents the data the widget displays at a particular point.
- Widget Sizes:
Widgets come in different sizes, allowing
users to choose the one that best fits their needs and home screen layout. The
sizes are:- Small: Displays minimal information.
- Medium: Displays more content, such as a combination of text and images.
- Large: Provides the most space for content, often used for complex data visualization or multiple pieces of information.
- Data Updates:
Widgets use a timeline to update content at specified intervals or in the background, ensuring the displayed information is current. - User Interaction:
Widgets allow limited interaction, like tapping to open the app or perform quick tasks, but don’t support complex navigation - Configuration:
Users can customize widgets by selecting data sources or options, such as choosing a location in a weather widget - Widget Lifecycle:
Widgets are lightweight and only refresh based
on the timeline or when requested, to conserve resources - Adding Widgets:
Users add widgets by entering “Jiggle mode,” selecting from the widget gallery, and customizing placement or size on the Home or Lock screen. - Widget Intent:
Some widgets use Intents for personalized content, like displaying specific calendar events or reminders - Performance Considerations:
Widgets should be efficient, with minimal code execution and infrequent data updates to save battery life
Let’s review the code step by step.
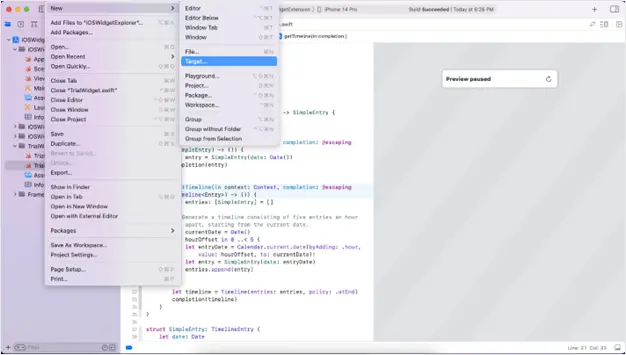
1. Creating a New Widget Extension
To start, open Xcode and either create a new project or use an existing one. Here’s how to add a widget extension to your project:
- File > New > Target: This opens the target selection window.
- Choose Widget Extension: Select this from the list and click Next.
- Name Your Widget: Provide a name that reflects your widget’s purpose, and click Finish. Xcode will generate a new target and the necessary files for your widget.
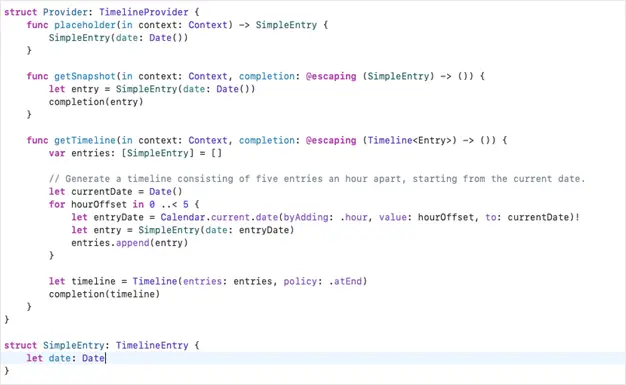
2. Configuring the Widget’s Functionality
- Widget Struct:
Defines your widget’s configuration, including data display and appearance. It comes pre-populated with basic template code. - TimelineProvider and Data Management:
Manages data updates for your widget’s timeline. Customize it to fetch and display dynamic data, whether from a remote server or local app data.
3. Designing the Widget’s UI
The TrialWidgetEntryView struct is where you define the widget’s appearance using SwiftUI. This view is responsible for displaying the data provided by the Provider.
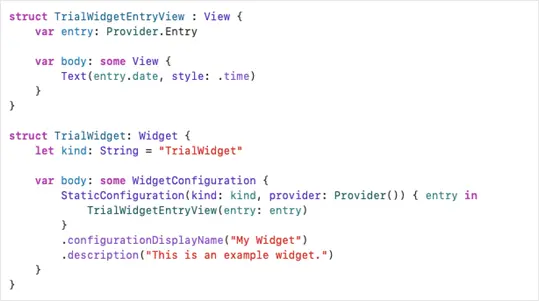
This simple view displays a date as a message. You can customize this with additional SwiftUI components to create a richer user interfaceExplanation:
- StaticConfiguration(kind: kind, provider: Provider()) { entry in:
StaticConfigurationis used when your widget does not need user customization (like changing the content or layout). It takes the kind (unique identifier) and a Provider, which supplies the data for the widget.- The closure
{ entry in ... }defines what view should be displayed for a given entry.
- TrialWidgetEntryView(entry: entry):
This creates an instance of the
TrialWidgetEntryViewview, passing in the entry object that contains the data for the widget - .configurationDisplayName(“My Widget”):
This sets the display name of the widget, which users will see when they add the widget to their home screen or widget gallery - .description(“This is an example widget.”):
This sets the description of the widget, providing a brief explanation of what the widget does. This description is also shown in the widget gallery when users are selecting widgets to add to their home screen
4. Fine-Tuning Widget Settings
Configuring Info.plist
In the widget’s Info.plist, you can define essential settings like the widget’s display name, description, supported families (e.g., small, medium, large), and more.
- Widget Display Name: This is the name that appears under your widget on the home screen.
- Supported Families: Define which widget sizes are supported by adding
CFBundleSupportedInterfaceOrientationsentries.
Conclusion
Creating widgets in iOS using app extensions can significantly improve the user experience by offering quick access to essential information. This guide helps you set up a basic widget, customize its appearance, and deliver dynamic content. Widgets are a powerful tool in iOS development, and with SwiftUI, they can be both visually appealing and highly functional.