In SharePoint, subsites provide a way to structure and organize content within a site collection. If you frequently create similar subsites, using a WSP (Windows SharePoint Solution Package) template can simplify the process. Power Automate can then automate subsite creation using this template.
Prerequisites:
- A SharePoint Online environment with administrative privileges.
- Power Automate access with the Site Admin permissions to create subsites.
Step 1: Save a SharePoint Site as a WSP Template
To create a reusable WSP template from an existing site:
- Navigate to the Source Site
- Go to the SharePoint site that you want to save as a template.
- Access Site Settings
- Click the gear icon > Site Settings.
- Enable “Save Site as Template” (if missing)
- If you don’t see Save Site as Template, activate it using PowerShell:
Powershell :

Enable-SPFeature -Identity "SaveSiteAsTemplate" -Url https://yourtenant.sharepoint.com/sites/yoursite- Save the Site as a Template
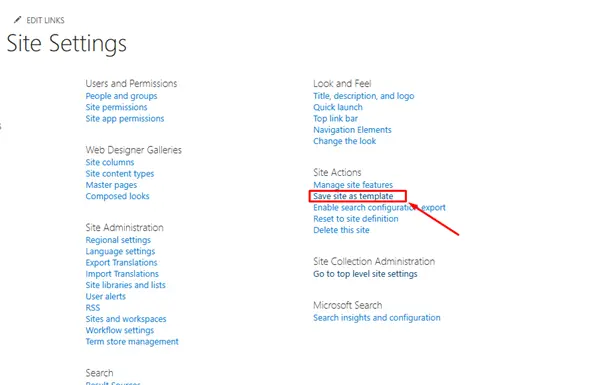
- Under Site Actions, click Save site as template.

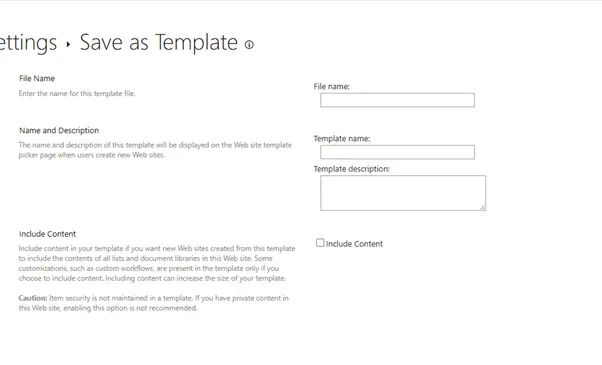
Enter a template name and filename (e.g., ProjectTemplate).

Check Include Content if you want to keep lists, libraries, and settings.
- Click OK, then Save.
5. Download the WSP File- Navigate to Site Settings > Solutions (under Web Designer Galleries).
- Locate your WSP file, click Download, and save it for later use.
Step 2: Upload and Activate the WSP Template
- Go to the SharePoint Solution Gallery
- Open the destination site collection.
- Navigate to Site Settings > Solutions.
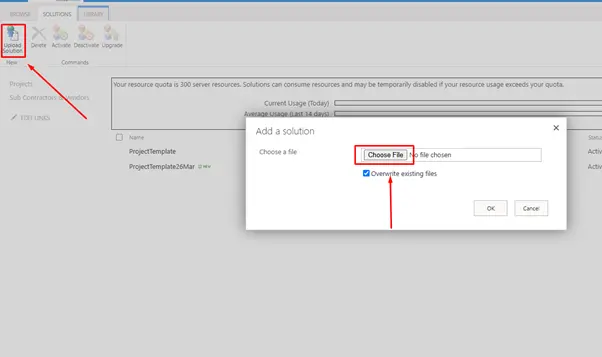
- Upload the WSP File
Click Upload Solution, select your .wsp file, and click OK.

- Activate the Solution
- Click on the uploaded solution and select Activate.
- The template is now ready to use for subsite creation.
Step 3: Create a Subsite Using Power Automate
Now, let’s use Power Automate to create a subsite based on the WSP template.
1. Create a New Flow in Power Automate
- Go to Power Automate and click New Flow > Instant Cloud Flow.
- Select Manually Trigger a Flow (or trigger it based on an event, such as a new list item).
2. Add an HTTP Request Action
- Click + New Step and search for HTTP.
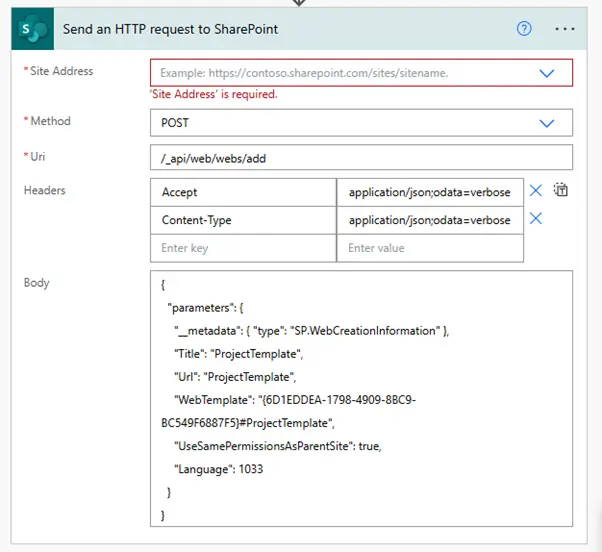
- Choose Send an HTTP request to SharePoint.
3. Configure the HTTP Request
- Use the following settings:
Method: POST
Site Address: Choose the parent site.
URI: _api/web/webs
Headers:

{
"Accept": "application/json;odata=verbose",

  "Content-Type": "application/json;odata=verbose"
}

Body:
{

  "parameters": {

    "Title": "New Subsite",

    "Url": "new-subsite",

    "WebTemplate": "STS#0",

    "UseSamePermissionsAsParentSite": true,

    "Description": "This is a new subsite created from a template",

    "Language": 1033
}

If your WSP template has a custom name (e.g., ProjectTemplate), replace with your template name.
Step 4: Save and Test the Flow
- Click Save and then Test to check if the subsite is created.
- Go to your SharePoint site and confirm the subsite appears under Site Contents.
Conclusion
By following these steps, you can:
- Save a SharePoint site as a WSP template
- Upload and activate the template in the SharePoint solution gallery
- Use Power Automate to create subsites based on the WSP template
This approach saves time by automating subsite creation while ensuring consistency across your SharePoint environment.
At 200OK Solutions, we make it easier for businesses to streamline their SharePoint operations with innovative solutions. Our expert team can help you create SharePoint subsites using WSP templates, fully integrated with Power Automate. This seamless process allows for efficient site creation, automation, and management, saving time and resources. Whether you’re looking to build consistent sites across your organization or need a custom solution tailored to your needs, our services ensure a smooth, scalable approach to SharePoint management. Visit our blog to learn more about how we can help you unlock the power of SharePoint with automated workflows and templates
What’s the Real ROI of SharePoint Syntex for Your Organisation?
Get a practical ROI calculator + implementation checklist used by enterprises to modernize SharePoint with AI, without trial-and-error.

