In this blog, we will demonstrate how to integrate the Bluesky Post Search API with Power Automate to pull posts based on specific queries and store the results (news) in a SharePoint list. This will help businesses streamline news collection and automatically store relevant posts directly into SharePoint for easy management.
Prerequisites:
- Bluesky API: Ensure that you have access to the Bluesky Post Search API.
- Power Automate: A Power Automate subscription with access to create flows.
- SharePoint Site: A SharePoint site with a list created to store the data (e.g., “News Posts” list with columns like Title, URL, and Post Content).
Step 1: Set Up Your SharePoint List
First, create a SharePoint list where you will store the fetched data. Your list can have the following columns:
- Title (Text) – The title of the post
- Post Content (Multiple lines of text) – The content or summary of the post
- URL (Hyperlink) – A direct link to the original post
- Created Date (Date and Time) – Date when the post was fetched
Step 2: Create a Power Automate Flow
- Go to Power Automate: Open Power Automate and sign in with your credentials.
- Create a New Flow:
- Select Create in the left sidebar.
- Choose Automated flow to trigger the process automatically.
- Name your flow (e.g., “Bluesky Post Search Integration”).
- Choose the trigger based on your needs, for example, a Recurrence trigger to fetch new posts every hour or day.
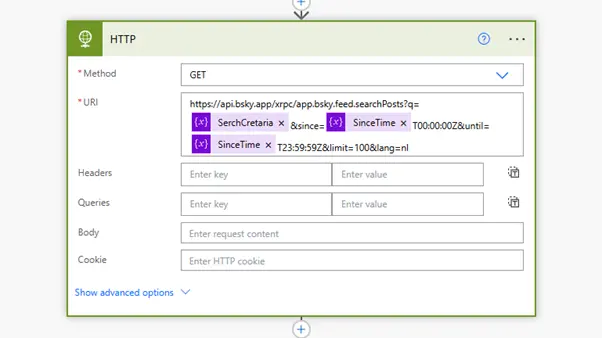
- Add an HTTP Request to Call Bluesky API:
- In your flow, add a new HTTP action after the recurrence trigger.
- Configure the HTTP request with the Bluesky Post Search API URL and necessary headers:
- Method: GET
- URI: https://api.bluesky.social/v1/posts/search?query=YOUR_QUERY_HERE (replace YOUR_QUERY_HERE with your actual search query)
Example:
Method: GET
URI: https://api.bluesky.social/v1/posts/search?query=technology
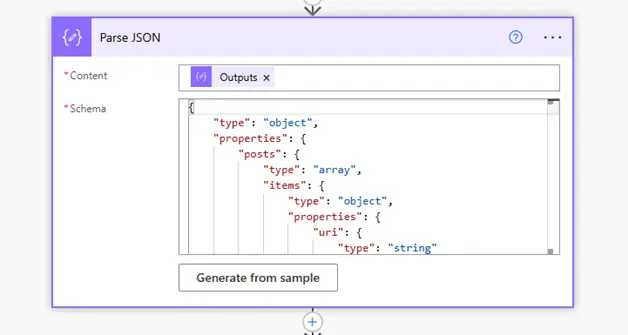
- Parse the Response:
- Add a Parse JSON action to handle the data returned by the API.
- Use the output from the HTTP action as the input for the Parse JSON action.
- The schema for the response might look like this (based on Bluesky API response):
- Loop Through the Posts:
- Add an Apply to each action to loop through the posts returned from the API response.
- Inside the loop, you’ll be adding the action to store the post in SharePoint.
- Add SharePoint Action:
- After the loop, add the Create item action for SharePoint.
- Select your SharePoint site and the list you created in Step 1.
- Map the fields from the API response to the SharePoint columns:
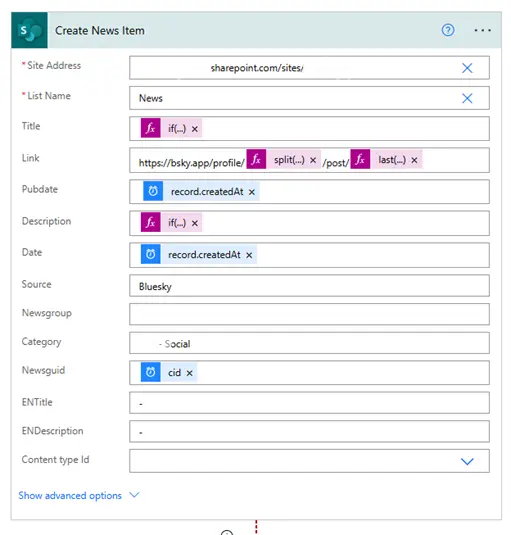
Example:
- Title: items(‘Apply_to_each’)?[‘text’]
- Post Content: items(‘Apply_to_each’)?[‘text’]
- URL: items(‘Apply_to_each’)?[‘url’]
- Created Date: items(‘Apply_to_each’)?[‘created_at’]
7 Save and Test: Save your flow and run a test to make sure that the data is being pulled from Bluesky and stored in the SharePoint list correctly.
Step 3: Monitor the Flow
Once your flow is set up, you can monitor it directly within Power Automate. If there are any issues or errors, you can troubleshoot by looking at the run history of the flow.
Step 4: Automate the Search
You can schedule the flow to run periodically to fetch the latest posts based on your search query. You can adjust the frequency of the recurrence trigger to suit your needs (e.g., every hour, every day, etc.).
Conclusion
By following this guide, you can easily integrate Bluesky’s Post Search API with Power Automate and store the latest posts in a SharePoint list. This integration can be used for a variety of use cases, such as monitoring industry news, collecting customer feedback, or tracking social media trends for your business.
At 200OK Solutions, we specialize in seamless API integrations that enhance efficiency and productivity. In this guide, we explore how to integrate Bluesky API with Power Automate, enabling businesses to automate tasks effortlessly. Whether you’re looking to streamline workflows, enhance data synchronization, or improve operational efficiency, our step-by-step tutorial provides expert insights and practical solutions tailored to your needs. Let 200OK Solutions help you unlock the full potential of API automation with Microsoft Power Automate! 🚀
What’s the Real ROI of SharePoint Syntex for Your Organisation?
Get a practical ROI calculator + implementation checklist used by enterprises to modernize SharePoint with AI, without trial-and-error.