In this tutorial, I’ll Walk you through a step-by-step example of implementing full-text search in Laravel using Laravel Scout and Algolia.
Laravel provides us with the Scout package for adding a powerful full-text search layer on top of Eloquent models. Combined with Algolia, it makes search queries super-fast and efficient. If your application requires a smooth and accurate search functionality, this is the best way to go.
We’ll start from scratch and build a working search system in a fresh Laravel application.
Step 1: Install Laravel
If you don’t already have a Laravel project, create a fresh installation:
composer create-project --prefer-dist laravel/laravel algolia_exampleStep 2: Install Required Packages
We need two packages:
- laravel/scout – provides the search integration.
- algolia/algoliasearch-client-php – connects Scout to Algolia.
Install Scout:
composer require laravel/scoutPublish Scout’s config file:
php artisan vendor:publish --provider="Laravel\Scout\ScoutServiceProvider"Now enable queue support in your .env file:
SCOUT_QUEUE=trueNext, install the Algolia client:
composer require algolia/algoliasearch-client-phpStep 3: Configure Algolia
Create an account on Algolia.
After logging in, grab your Application ID and Admin API Key from the Algolia dashboard.
Add them to your .env file:
ALGOLIA_APP_ID=your-app-id

ALGOLIA_SECRET=your-admin-api-key
Also, update config/scout.php to use Algolia as the driver:
'driver' => env('SCOUT_DRIVER', 'algolia'),Step 4: Create Items Table and Model
Generate a migration for an items table:
php artisan make:migration create_items_tableMigration example:
Schema::create('items', function (Blueprint $table) {

$table->increments('id');

$table->string('title');

$table->timestamps();

});
Run migration:
php artisan migrateNow create the Item model:
php artisan make:model ItemAdd the Searchable trait and define searchable fields:
namespace App\Models;

use Illuminate\Database\Eloquent\Model;

use Laravel\Scout\Searchable;

class Item extends Model

{

use Searchable;

protected $fillable = ['title'];

public function searchableAs()

{

return 'items_index';

}

public function toSearchableArray()

{

return [

'id' => $this->id,

'title' => $this->title,

];

}

}
Step 5: Add Routes
Open routes/web.php and add:
use App\Http\Controllers\ItemSearchController;

Route::get('items-lists', [ItemSearchController::class, 'index'])->name('items-lists');

Route::post('create-item', [ItemSearchController::class, 'create'])->name('create-item');
Step 6: Create Controller
Generate a controller:
php artisan make:controller ItemSearchControllerInside ItemSearchController.php:
namespace App\Http\Controllers;

use Illuminate\Http\Request;

use App\Models\Item;

class ItemSearchController extends Controller

{

public function index(Request $request)

{

if ($request->has('titlesearch')) {

$searchTerm = $request->titlesearch;

try {

$items = Item::search($searchTerm)->paginate(6);

} catch (\Exception $e) {

// fallback to database query if Algolia fails

$items = Item::where('title', 'like', "%{$searchTerm}%")->paginate(6);

}

} else {

$items = Item::paginate(6);

}

return view('item-search', compact('items'));

}

public function create(Request $request)

{

$request->validate([

'title' => 'required'

]);

Item::create($request->all());

return back();

}

}
Step 7: Create Blade View
Create a new file: resources/views/item-search.blade.php
<!DOCTYPE html>

<html>

<head>

<title>Laravel Scout Algolia Search Example</title>

<link rel="stylesheet" href="https://maxcdn.bootstrapcdn.com/bootstrap/3.3.7/css/bootstrap.min.css">

</head>

<body>

<div class="container">

<h2>Laravel Full Text Search using Scout & Algolia</h2>

{{-- Add New Item Form --}}

<form method="POST" action="{{ route('create-item') }}">

@csrf

<div class="row">

<div class="col-md-6">

<input type="text" name="title" class="form-control" placeholder="Enter Title" required>

</div>

<div class="col-md-6">

<button class="btn btn-success">Create New Item</button>

</div>

</div>

</form>

<br>

{{-- Search Form --}}

<form method="GET" action="{{ route('items-lists') }}">

<div class="row">

<div class="col-md-6">

<input type="text" name="titlesearch" class="form-control" placeholder="Search by Title">

</div>

<div class="col-md-6">

<button class="btn btn-primary">Search</button>

</div>

</div>

</form>

<br>

{{-- Item List --}}

<table class="table table-bordered">

<thead>

<tr>

<th>#</th>

<th>Title</th>

<th>Created</th>

<th>Updated</th>

</tr>

</thead>

<tbody>

@forelse($items as $index => $item)

<tr>

<td>{{ $index + 1 }}</td>

<td>{{ $item->title }}</td>

<td>{{ $item->created_at }}</td>

<td>{{ $item->updated_at }}</td>

</tr>

@empty

<tr>

<td colspan="4">No data found.</td>

</tr>

@endforelse

</tbody>

</table>

{{ $items->links() }}

</div>

</body>

</html>
Step 8: Import Existing Records into Algolia
If your table already has data, sync it with Algolia:
php artisan scout:import "App\Models\Item"If queues are enabled, remind users to start the queue worker:
php artisan queue:workStep 9: Run the Application
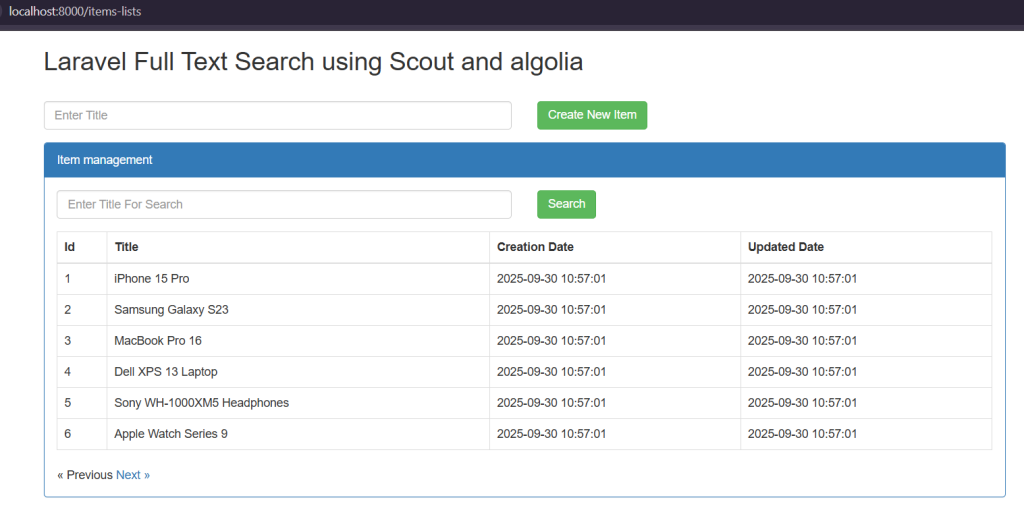
Start the Laravel development server:
php artisan serveVisit the app:
http://<host:port>/items-listsNow you can add new items and search them using Algolia-powered full-text search.
Conclusion
In this tutorial, we successfully integrated Laravel Scout with Algolia to build a real-time full-text search feature.
With Scout, you don’t need to write complex search queries – it automatically syncs your models to Algolia and makes search blazing fast.