In this blog post, we’ll explore how to integrate Google ML Kit’s text recognition capabilities into a Flutter app. Google ML Kit provides a powerful suite of machine learning features that allow developers to incorporate advanced functionalities like text recognition, face detection, barcode scanning, and more into their apps with ease. Flutter, with its growing ecosystem, provides an excellent platform to seamlessly implement these features and build cross platform apps.
By the end of this guide, you’ll have a working Flutter app that can pick an image from the gallery, extract text using Google ML Kit, and display the recognized text on the screen.
Why Use Google ML Kit with Flutter?
Google ML Kit provides on-device machine learning capabilities that make it easy to integrate AI-powered features into your app. Flutter, being a highly productive cross-platform framework, allows you to implement such features for both Android and iOS with minimal effort.
Using google_ml_kit package in Flutter, you can integrate machine learning features like text recognition, image labeling, barcode scanning, and language identification in just a few steps, all while maintaining a smooth user experience across platforms. The combination of Flutter and Google ML Kit helps you take full advantage of modern machine learning technologies in your apps with high performance and ease of use.
Prerequisites
Before we start, ensure you have the following setup:
- Flutter SDK: Follow the official Flutter installation guide if you haven’t installed it yet.
- Google ML Kit: To enable text recognition, we’ll be using the Google ML Kit package.
- Image Picker: The image_picker package allows us to select images from the gallery or camera.
Step 1: Set Up the Project
Begin by creating a new Flutter project:

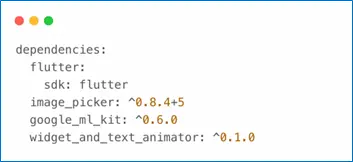
Now, open the pubspec.yaml file and add the necessary dependencies:

Run flutter pub get to install the packages.
Step 2: Add Permissions
To access the camera and gallery for image selection, add the following permissions:
- Android: Update the AndroidManifest.xml file located at android/app/src/main/AndroidManifest.xml:

- iOS: Update the Info.plist file located at ios/Runner/Info.plist:

Step 3: Build the User Interface
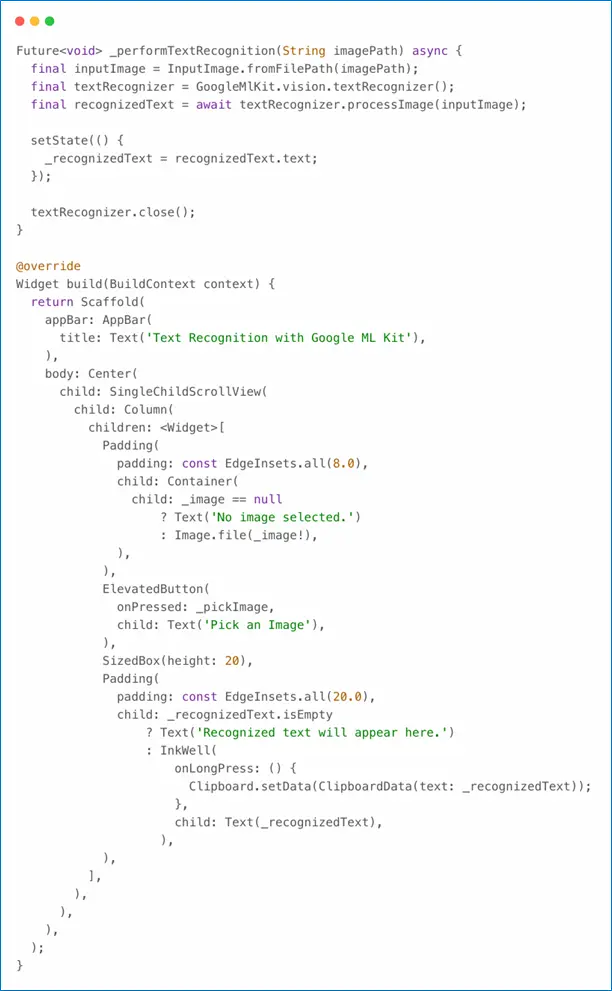
Let’s now create a simple UI to allow users to select an image, display it, and show the recognized text. Here’s the code for the UI:

Step 4: Implement Text Recognition
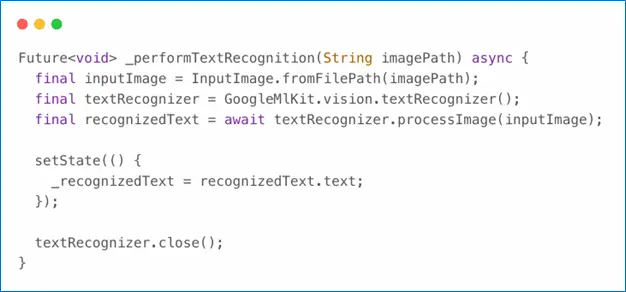
The core functionality of this app is the text recognition feature, which uses Google ML Kit to extract text from the selected image.
When an image is selected, it is passed to GoogleMlKit.vision.textRecognizer() for text recognition. Here’s how it works:

Step 5: Display Recognized Text
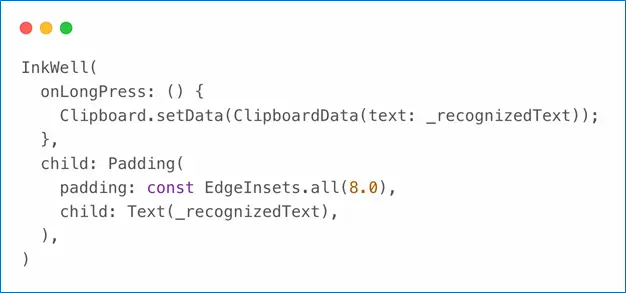
Once the text is recognized, we display it on the screen. Additionally, we provide an option for users to long-press the recognized text to copy it to the clipboard.

Step 6: Run Your App
Now you can run your app on an emulator or a physical device:
You can find the complete source code on GitHub at the following link:
MLKit Example – GitHub Repository
Here are a few reference links to help you dive deeper into Google ML Kit and Flutter:
Official documentation on Google ML Kit, including detailed guides on text recognition, barcode scanning, face detection, and more.
Flutter Google ML Kit Package:
The google_ml_kit Flutter package, including setup instructions and usage examples.
Image Picker Package for Flutter:
The image_picker Flutter package documentation to help you integrate image picking from the gallery or camera.
Flutter Example: ML Kit Text Recognition:
A comprehensive example of using ML Kit for text recognition in Flutter apps.
Conclusion
With this app, you’ve successfully integrated Google ML Kit’s text recognition functionality into a Flutter app. The combination of Flutter’s cross-platform capabilities and Google ML Kit’s powerful machine learning features opens up exciting opportunities to add AI-powered features to your mobile applications. From text recognition to face detection and barcode scanning, Google ML Kit provides all the tools you need to create intelligent, engaging apps.


