Structure of Content
- Setup Project into firebase console
- Remote Notification
- Local Notification
Setup Project into firebase console
- Firebase console account must require
- Create a project
- Add android app into created project, go to android/app/build.gradle find applicationId, now use same applicationId while adding app as android package name, once app is added make sure download the google-services.json file.
Remote Notification
1. Installation of remote notification module
- Using NPM command
- npm install –save @react-native-firebase/app
- npm install –save @react-native-firebase/messaging
- Using YARN command
- yarn add @react-native-firebase/app
- yarn add @react-native-firebase/messaging
2. Configuration on native android
- Configure Firebase with Android credentials
- downloads google-services.json from firebase console and add into android/app folder.
- add the google-services plugin as a dependency inside of your android/build.gradle file.
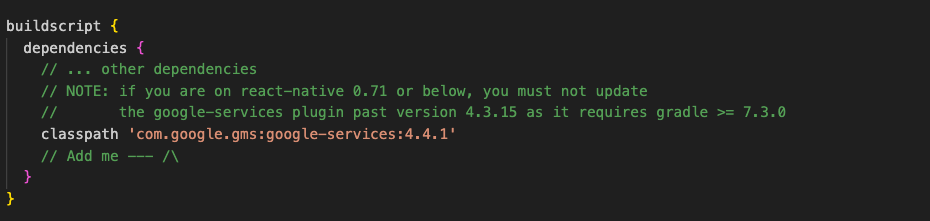
3. execute the plugin by adding the following to your android/app/build.gradle file

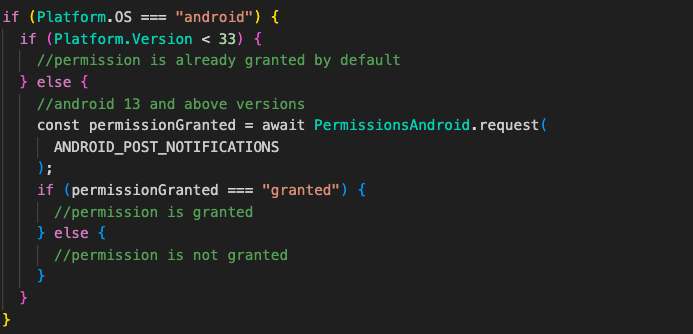
- Permission setup
- On Android API level 32 and below, no need to request for permissions, by default permission will already be granted.
- For API level 33 and above, must request for the permission.
- Add use permission tag of “POST_NOTIFICATIONS” into AndroidManifest.xml
<uses-permission android:name=”android.permissions.POST_NOTIFICATIONS” />- Notification icon generator and setup
- Generate notification icon from AndroidAssetStudio/icons-notification.html.
- Add icons into android/app/src/main/res/mipmap-* based on size.
- Set custom default icon and its colour into AndroidManifest.xml and it should be within <application /> tag.
<meta-data
android:name = “com.google.firebase.messaging.default_notification_icon” android:resource=”@mipmap/ic_notification” />
<meta-data

android:name=”com.google.firebase.messaging.default_notification_color”
android:resource=”@color/notification_color”
tools:replace=”android:resource” />
3. Usage
- Requesting Permissions
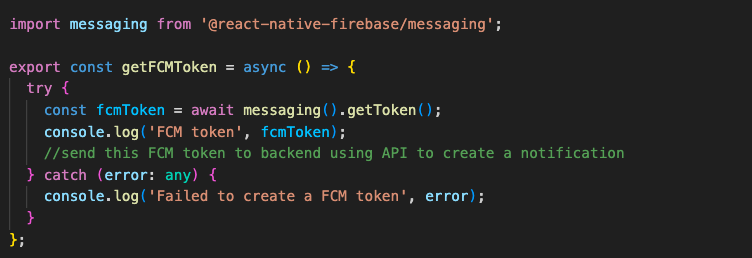
- Create a firebase token and submit a token to backend to create notifications
- Handle Notifications
Notifications will be received in 3 app state are Quit, Background and Foreground.

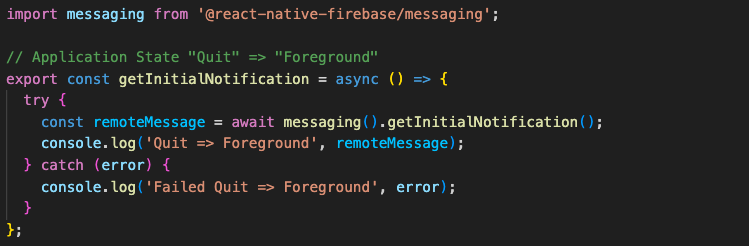
- Quit state: if app in Quit state and tap on notification, getInitialNotification() method will be triggered with notification data.
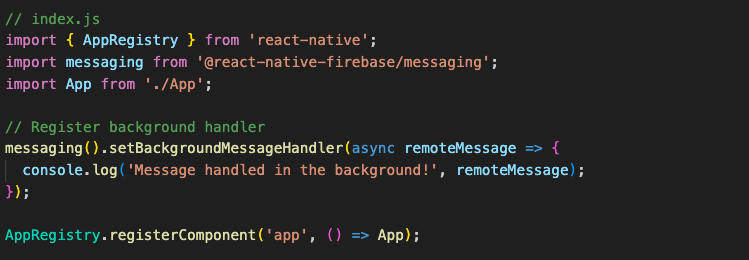
2. Background state
a. To setup a background handler, call the setBackgroundMessageHandler() outside of your application logic as early as possible.
b. if app in Background state and tap on notification, onNotificationOpenedApp() method will be triggered with notification data.

3.Foreground state
a. if app in Foreground state and tap on notification, onMessage() method will be triggered with notification data
b. we can create a local notification using notification data received into onMessage() method listener.

Local Notification
- Installation of local notification module
- Using NPM command
- npm install –save @notifee/react-native
- Using YARN command
- yarn add @notifee/react-native
- Using NPM command
- Create local notification
- Permission setup
- On Android, notification permissions are granted by default. However, a user may revoke them later through various means. In addition, a user may manage or revoke permissions at any of three levels; application-wide, channel groups and channels.
- Create a channel id
- Permission setup

- Create a local notification using created channel id
- Handle local notification

Learn More: